Friday, 9 December 2011

Presentation

Intial idea
Modern or Future?
Future!
More Imagination, More freedom
Chance to make more unique creations.
Inspiration and Research


How this helped my work!


Added effect for futurism


From this to this


Tools used
Boolean
Render Effects(lens effects, glow)
Stair presets
opacity(for glass, windows)

Street lights


Unique Shape
Blend into the futuristic environment


Presentation Outcome
Overall I feel happy and confident with the result of my presentation and how I presented my work to my peers. I feel I conveyed my idea, it's development and the result so far in an understandable way that kept things interesting but straight to the point about how my work started out and how it progressed to what it is now in good verbal and visual way.


Thursday, 8 December 2011

Urban Street Development

Since I started with my idea to create a futuristic urban street, I feel my progress has gone to plan and expanded behind what I originally planned. I feel I managed to follow a sort of unique creation but that still follows a traditional futuristic visual.


After a while of creating the buildings for my street, I started to feel there wasn't enough to distinguish my idea as a futuristic environment, I felt it needed something else to boost it's futuristic visual. So I looked for some inspiration to achieve this and I achieved this from the movie Tron with it's neon lit up streets, lights running through roads and buildings. I felt this was a great and necessary addition to my work to help create the futuristic feel and look it needed.

Friday, 18 November 2011

3D texturing and lighting

We learnt how to to create a realistic glossy floor tiling by using two of the same images of the till but one in colour and the other non coloured.

Friday, 4 November 2011

Concept drawing

This is a quick concept drawing I made to help inspire and image what I plan to make my city look like. This is a futuristic city from my imagination and this is along the lines of how I would like my urban area to look like.

Friday, 21 October 2011

Line Lathe Experimentation

The line lathe tool was an interesting and useful tool to use for experimentation and create random objects. By using this tool, it would create objects from a line drawn, the object can be random every time, creating some very different and unique objects. I was often surprised how I managed to create a objects that are quite a common sight in reality. Here are a few of my experimentations.
Here I created a cocktail glass just from experimentation with random lines 

Here I was surprised how I created a realistic looking parasol.

Here a two more objects that look like drinking glasses, however the on right object could also pass as a lamp. This shows how creating some random objects through line lathe could have more use in your work through easy creation.

Friday, 14 October 2011

3D textured building

Here I was taught how to use a texture of a building to be placed onto a flat object in Max. The aim of this demo was to be able to place this texture onto the flat object and then be able to alter the shape of the object to fit with the texture more. Between these two screen grabs you can see how the top half of the object has been pushed back, and the lower roof part has been turned at an angle, and the door has been pushed back to give the impression of a doorway. The method of this was done converting the object to editable poly, this in turn allowed me to edit certain areas of the object with affecting the entire object.
This demo was a great tutorial of how we can simply use a picture of building as a texture for a flat object to create our own variations of buildings for our work if needed. 

Transparency

Here I made a 3d model of a transparent window. 


This is my final outcome from the demo of a transparent window.
By experimenting I managed to create a smashed window effect from what I created from the demo. By simply making a quick spider web effect with the line tool in photoshop I managed to put this as texture on the  transparent window. This still kept the transparency so you could see either side, whilst also having the texture over it aswell. For a quick experimentation I am rather pleased with this as I feel it worked well and looks correct even as a result of a quick play around.

Texturing


Here I created a thin box, then using the rotation tool, I duplicated my box whilst rotating to bring the new dupe box down to make the floor. I then used material editor(shortcut M) and brought a bitmap through of a wall texture, then applied to the standing wall. The picture looked too large and distorted so I  used the Real world scale and experimented with the tiling tool until the image was of better focus on the wall.


Friday, 30 September 2011

Setting/Architectural style

I am going to base my architecture style on a Sci-fi futuristic city. The city could consist of a high tech environment, usually dark but with street lights(neons are common) These environments could be either grungy, cyber punkish or immaculate, smooth and shiny.
This is what I would describe as a clean, civilised future city environment

These two images would fit a rough, beat down style of a futuristic city.  

This pictures is a good example of a a prosperous city, with a poor section just outside of the city. This shows a mixture of rich and poor, upper class and lower class.


On the left is the original image, unedited. And the image on the right is after editing. 
The signpost had been removed using content-aware. And then using healing brush and clone stamp, I just cleared up any obvious signs of editing. Secondly I removed the bottom window again with the content-aware and repeated the same as before by removing any left over parts of the window that may of remained.

Tokyo, Shibuya


I really like the architectural design and look of the city Tokyo. Especially the Shibuya. In my opinion Tokyo city has always had a sort of futuristic look and feel to it, particularly its night life.  


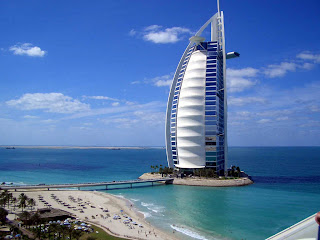
Dubai

I also like the design of many of the buildings in Dubai, I also feel like they have a very shiny, slick and futuristic look to them.

Friday, 23 September 2011

I like the angle of this image, with the corner shops and the buildings on the side as you look up the street


I like the building in this image and the windows and this street view.


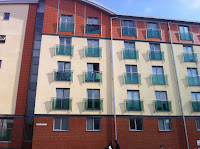
I like the architecture of these buildings and their windows. I also like the corner balcony's of the left most building, the look of these buildings are very modern,


In like this picture for it's view of the street and the buildings the left and the building in the distance. I quite like the design on the same building.

I like this picture for it's building design, the look of this building is very inspiring for my work as it gives off a slight futuristic feel to it and how I see it, I look at this and can see how it could fit into a futuristic environment with maybe a little bit of variation done to it.

This picture to me was also very inspiring for it large glass based design. This is also something I can see being in a futuristic environment, a building design made heavily on glass.

UVW Unwrapping

Friday, 16 September 2011

Basic 3D modelling

In our demo, we learned the process of creating a crate in 3D Max. We begun simply by creating a square box, and the setting the coordinates to the centre. I then converted the box to a editable poly (This allows me to edit the object in many ways such as being able to select certain edge points of the object and then manipulate them how I want or the ability to select any face of the object and then manipulate that entire selection). I then selected the outer lines of the box and extruded them. I saved this selection as outer faces for later editing. I then selected the inside faces of the box and saved those as the inner faces. With these two saved as separate selections, it allowed me to add a separate texture to either one. So I added a metal or wood like texture to the outer faces and then a different wood texture to the inner faces.

Here is the box in it's editable poly form, the red is the faces of the box as it was made, and the blue is newly extruded edges to create the shape of the crate.
Here is finished and textured crate, now duplicated and bunched together as a pile of crates. You can see how there is a wood texture of the inside of the crate faces and a metal texture on the outside edges of the crate.